Japanese Steamed Pork Buns - Nikuman (肉まん)
I am totally stepping out of my comfort zone with this recipe. I have never ever made steamed buns before in my life.
Talking about steamed buns, I remember too well the one time I tried to steam those commercial frozen char-siu buns for breakfast. Instead of feeding my stomach, I fed the thrash bin. Long story short: I placed the buns directly on the perforated layer of the steamer with too much water boiling below. I ended up with soggy buns.
My mom didn't know whether to shout at me or laugh when she saw the soggy mess in my hands. She did neither, perhaps too distraught by the thought of having produced such bird-brained daughter.
That was two decades ago and many char-siu buns later. But it still make me want to slap my forehead whenever I think about it.
I don't know for sure what is the proper way to use those steamer but I know my best protection against my own stupidity is to put whatever I am steaming in a plate first and then place it onto the perforated layer. Come hell or high water boiling below, I know the food won't be soggy.
The idea of making these steamed buns came to me from a very delicious looking post on Nikuman by La Fuji Mama.
While doing research into making nikuman, I found this very useful video by CookingWithDog. Especially the part on how to seal the buns.
According to the video and Wikipedia, it seems that nikuman is something typically eaten during colder days. Since we don't have seasons here, I cannot understand why it should not be eaten year round. At least that's what we do here, especially at dim sum places.
Well, cool weather or not, I just want some steamed pork buns. Flipping through my Chinese cookbooks helps to give me a photo walk-through, but I was totally lost on the instructions. It might as well have been written in Korean or Arabic. I think I can understand Japanese cookbooks better. I was about to give up on my cookbooks until I saw a very promising recipe. In fact, two very promising recipes. Thank you Mr. Mark Bittman.

Here I'd used a meat and Chinese chives filling meant for wontons, but I am sure that the buns can be filled with anything that takes your fancy. Also I'd used a combination of yeast and baking powder instead of one which relies on baking powder solely.
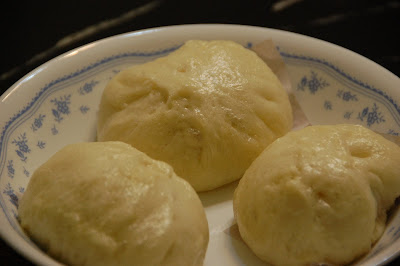
The buns came out soft and springy, but Hubby complained that I was such a miser with the filling. I had two very good reasons to err on the side of caution. Firstly, I wasn't quite sure how to estimate the dough and filling ratio per bun yet, but I think this comes with pratice. And secondly, I don't know how to seal the buns properly. I just watched the video once and winged it. Of the 16 buns I made, the last 3 looked at least more like steamed buns. The rest are ... distant relatives.
Meat and Chinese Chives Filling
(adapted from The Best Recipes In The World)
Ingredients
500g ground pork
2 cups chopped Chinese Chives
1 heapful finely chopped fresh ginger
1 egg, slightly beaten
1 tbsp soy sauce
2 tsp sesame oil
2 tsp Chinese cooking wine
1/2 tsp salt
White peper
Directions
Mix everything together in a bowl and refrigerate until ready to use.
Dough for Chinese Steam Buns
(adapted from The Best Recipes In The World)
Ingredients
1 1/2 cups Hongkong flour (a bleached soft flour specially made for steamed buns; can be replaced by cake flour)
1 1/2 cups plain/all-purpose flour
1 1/4 tsp instant dry yeast
1 1/2 tsp baking powder
2 tbsp sugar
1 tbsp vegetable oil
1 cup warm water
Directions
1. Combine all the ingredients in the mixing bowl of the standing mixer.
2. Mix with dough hook until the mixture forms a ball. Continue to knead until the dough is smooth and even mixed.
3. With your hands, roughly shape the dough into a ball and put it back into the mixing bowl to rise until double in bulk, about 2 - 2.5 hours.
4. In the meanwhile, cut 18 pieces of baking paper (I had a hard time peeling it off the steamed buns and will look for those waxy types next time) and set aside.
5. Deflate the dough and roughly shape into an even log. Divide the dough into 18 pieces.
6. Roll each piece into a thin disc and scoop about 1 tbsp of meat filling onto the disc. For details on how to seal the buns, please refer to the video for visual guide.
7. Cover the buns with a loose plastic wrap and let it rise for 20 minutes. Then steam the buns over medium-low heat for about 12 minutes.
Talking about steamed buns, I remember too well the one time I tried to steam those commercial frozen char-siu buns for breakfast. Instead of feeding my stomach, I fed the thrash bin. Long story short: I placed the buns directly on the perforated layer of the steamer with too much water boiling below. I ended up with soggy buns.
My mom didn't know whether to shout at me or laugh when she saw the soggy mess in my hands. She did neither, perhaps too distraught by the thought of having produced such bird-brained daughter.
That was two decades ago and many char-siu buns later. But it still make me want to slap my forehead whenever I think about it.
I don't know for sure what is the proper way to use those steamer but I know my best protection against my own stupidity is to put whatever I am steaming in a plate first and then place it onto the perforated layer. Come hell or high water boiling below, I know the food won't be soggy.

The idea of making these steamed buns came to me from a very delicious looking post on Nikuman by La Fuji Mama.
While doing research into making nikuman, I found this very useful video by CookingWithDog. Especially the part on how to seal the buns.
According to the video and Wikipedia, it seems that nikuman is something typically eaten during colder days. Since we don't have seasons here, I cannot understand why it should not be eaten year round. At least that's what we do here, especially at dim sum places.
Well, cool weather or not, I just want some steamed pork buns. Flipping through my Chinese cookbooks helps to give me a photo walk-through, but I was totally lost on the instructions. It might as well have been written in Korean or Arabic. I think I can understand Japanese cookbooks better. I was about to give up on my cookbooks until I saw a very promising recipe. In fact, two very promising recipes. Thank you Mr. Mark Bittman.

Here I'd used a meat and Chinese chives filling meant for wontons, but I am sure that the buns can be filled with anything that takes your fancy. Also I'd used a combination of yeast and baking powder instead of one which relies on baking powder solely.
The buns came out soft and springy, but Hubby complained that I was such a miser with the filling. I had two very good reasons to err on the side of caution. Firstly, I wasn't quite sure how to estimate the dough and filling ratio per bun yet, but I think this comes with pratice. And secondly, I don't know how to seal the buns properly. I just watched the video once and winged it. Of the 16 buns I made, the last 3 looked at least more like steamed buns. The rest are ... distant relatives.
Meat and Chinese Chives Filling
(adapted from The Best Recipes In The World)
Ingredients
500g ground pork
2 cups chopped Chinese Chives
1 heapful finely chopped fresh ginger
1 egg, slightly beaten
1 tbsp soy sauce
2 tsp sesame oil
2 tsp Chinese cooking wine
1/2 tsp salt
White peper
Directions
Mix everything together in a bowl and refrigerate until ready to use.
Dough for Chinese Steam Buns
(adapted from The Best Recipes In The World)
Ingredients
1 1/2 cups Hongkong flour (a bleached soft flour specially made for steamed buns; can be replaced by cake flour)
1 1/2 cups plain/all-purpose flour
1 1/4 tsp instant dry yeast
1 1/2 tsp baking powder
2 tbsp sugar
1 tbsp vegetable oil
1 cup warm water
Directions
1. Combine all the ingredients in the mixing bowl of the standing mixer.
2. Mix with dough hook until the mixture forms a ball. Continue to knead until the dough is smooth and even mixed.
3. With your hands, roughly shape the dough into a ball and put it back into the mixing bowl to rise until double in bulk, about 2 - 2.5 hours.
4. In the meanwhile, cut 18 pieces of baking paper (I had a hard time peeling it off the steamed buns and will look for those waxy types next time) and set aside.
5. Deflate the dough and roughly shape into an even log. Divide the dough into 18 pieces.
6. Roll each piece into a thin disc and scoop about 1 tbsp of meat filling onto the disc. For details on how to seal the buns, please refer to the video for visual guide.
7. Cover the buns with a loose plastic wrap and let it rise for 20 minutes. Then steam the buns over medium-low heat for about 12 minutes.


Comments
Post a Comment